

Welcome to another creative and easy sewing project! Today, we’re diving into the delightful world of pincushions—those charming little helpers that keep your sewing pins and needles organized. In my latest YouTube video, I’m demonstrating two adorable pincushion designs: a petal pincushion and a tomato pincushion. Both are crafted using fabric scraps, embroidery floss, and fun buttons, making them not just practical, but also a joyful addition to your sewing space. Let’s get started!
Watch the Petal & Tomato Pincushion Tutorial here!
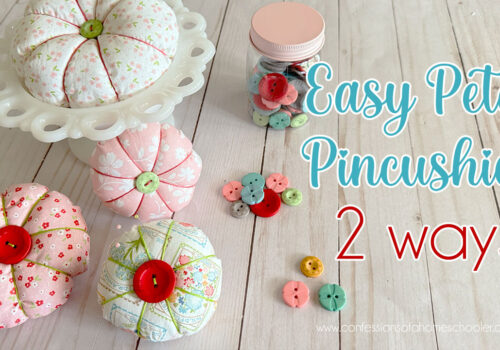
Petal Pincushion
Materials Needed:
- Fabric Scraps: Choose a variety of colors and patterns for a vibrant look.
- Embroidery Floss: Pick colors that complement or contrast with your fabrics.
- Buttons: Small, decorative buttons for the center.
- Needle and Thread: For assembling your pincushion.
- Stuffing: Cotton batting or polyester stuffing.
- Scissors: To cut your fabric.
- Fabric Marker or Chalk: For marking your fabric.
Steps:
- Cut Your Fabric: You can make these any size! Start by cutting two identical circles out of your fabric. I used a 6″ diameter circle and a 4-1/2″ diameter circle for the ones in the video.
- Assemble the Pincushion: With right sides together, sew the two circles together leaving a 1-1/2″ opening to turn right side out. Backstitch at the stops and starts.
- Add the Stuffing: Turn the pillow right side out, then, gently stuff the center with cotton batting or polyester stuffing. Make sure it’s firm but not too packed.
- Sew the opening closed: Using thread and needle, sew the opening closed with a whip-stitch or hidden stitch. Cut thread and bury it in the cushion.
- Add sections: Using about 1 yard of embroidery floss (all 6 strands) and a longer needle pull thread up through the bottom center of the cushion and through the top center, and pull thread through leaving a 6″ tail. Pull the thread around the cushion and meet back where you started. Run the needle under the top thread to secure it. Pull the thread around the cushion in the opposite direction, and catch the thread with your needle again. Repeat this going around the cushion two more times so you have 8 even sections. Pull the thread back through the center to the tail side. Pull both ends tight and secure with a knot. (See the video tutorial for help)
- Embellish with Buttons: Sew a cute button in the center of the pincushion to give it a finished look. This can be a fun, colorful button that stands out or one that blends in for a more subtle effect.
- Finish the Pincushion: Make any final adjustments to the shape and secure any loose threads.
Tomato Pincushion
Materials Needed:
- Red Fabric Scraps: For the main body of the tomato.
- Optional Green Fabric Scraps: For the leaves.
- Embroidery Floss: Coordinating floss for your fabric.
- Buttons: Optional, for added decoration.
- Needle and Thread: For sewing.
- Stuffing: Cotton batting or polyester stuffing.
- Scissors: For cutting fabric.
- Fabric Glue: Used to glue the leaf to the top.
Steps:
- Cut the Fabric: Cut out one 6″ round piece from your red fabric for the tomato body (This makes a 3″ pincushion, but you can make it any size!). You’ll also need a rough star shape from your green fabric or felt.
- Sew the Tomato Body: Thread your needle with 3-strands of sewing thread and tie a knot in one end. Sew a running stitch around the entire outside of the circle. Pull the thread to loosely gather the circle.
- Stuff the Tomato: Using thread and needle, sew the opening closed with a whip-stitch or hidden stitch. Cut thread and bury it in the cushion.
- Add sections: Using about 1 yard of embroidery floss (all 6 strands) and a longer needle pull thread up through the bottom center of the cushion and through the top center, and pull thread through leaving a 6″ tail. Pull the thread around the cushion and meet back where you started. Run the needle under the top thread to secure it. Pull the thread around the cushion in the opposite direction, and catch the thread with your needle again. Repeat this going around the cushion two more times so you have 8 even sections. Pull the thread back through the center to the tail side. Pull both ends tight and secure with a knot. (See the video tutorial for help)
- Create the Leaf: Cut a rough star shape from the green fabric or felt and attach it to the top of the tomato using fabric glue.
- Add Details: For extra flair, sew a cute button to the top of the pincushion!
- Finish the Pincushion: Make any final adjustments to the shape and secure any loose threads.
Conclusion
Creating your own pincushions is not only a fun and creative way to use up fabric scraps but also a great opportunity to personalize your sewing space. The petal pincushion adds a touch of floral charm, while the tomato pincushion brings a whimsical, classic vibe to your desk. Don’t forget to check out my YouTube video for a visual guide on crafting these pincushions, and feel free to mix and match fabrics, colors, and embellishments to make these projects uniquely yours!
Happy crafting! 🌸🍅