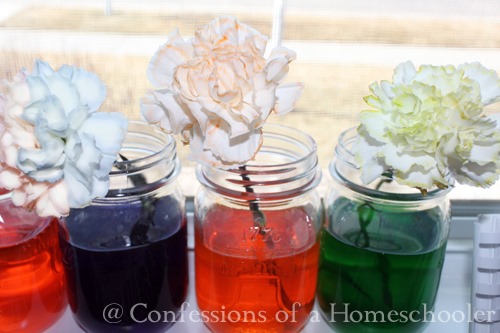
Hi everyone! So a few months ago we did a fun science experiment using food coloring and daisies to show how plants absorb water up through their stems.
Normally, plants have roots which absorb water from the soil. The water travels through the roots and up the stem and into the leaves. The leaves gather sunlight, then use the sunlight, carbon dioxide, and water to make food for the plant in a process called photosynthesis. Cut flowers don’t have roots, but the water still moves up the stems and into the leaves giving a nice visual to how the process works.
After our last experiment the kids wanted to try it again, but this time we thought we’d try to die one flower two different colors.
I have to say this one was a bit trickier!
What you will need:
- White Daisies or Carnations (However many you’d like to use, we did four)
- Glass Mason Jars
- Food Coloring or liquid watercolors
- Cutting board & Exacto Knife
Time to experiment with our flowers!
So first we took a cutting board and carefully sliced a couple of our flowers right up the center of the stem. This was a tricky process so I suggest getting a few back up flowers just in case you accidentally cut one too far.
Which I did.
More than once.
Next mix your food coloring in some water in a few different jars, cups, or whatever you have on hand.
Then carefully place your flowers into the jars, putting one side of the stem in to one jar, and the other side into another jar. If you have skinnier vases it would probably work better. As you can see the stem on far right flower broke because my jars caused the stem to split too far. I ended up just putting that whole flower into the Green so we didn’t have two orange flowers.
After a few hours you will start to notice the tips of the leaves showing the color from the water.
The one we put in the green and orange water didn’t work. I think I cut the stem a little too far off to one side for it to soak up any of the water. But the green definitely made it’s way up the stem!
And here’s a closer picture of the one I cut in half better. we put one side in orange water and the other in purple. You can see how it’s slightly starting to tint the flower into two different shades.
As you can see the color from the purple definitely took hold, the orange side got a tint to it, but not as much color. The kids were thrilled though to see how the water traveled up the stem and colored the flower in two different shades!
Hope you enjoyed this little science project. We are having fun with our flower dying experiments. Now that we know we need skinnier vases we might try again to see if we can get a better result!
Have you already tried this? Make sure to comment below. I’d love to see your results!


That is so cool – I have been thinking about this experiment for a while and wanting to try it, but I had always thought that to get multi-colored flowers you put the flower in one color for a while, then moved it to another color. 🙂 Now we have an experiment to do – 1 – flower in water 2- flower moved between two colors of water and 3 – flower with a split stem! Thanks so much for the idea!
We did this last week with daffodils. I took pictures but haven’t blogged about it yet; I’ll have to remember to do that next week 🙂
This will be a great Spring project. Thanks for sharing!
How fun! I’ve seen this done at Easter time as a way to teach about Christ’s atonement and “taking our sins upon him” just as the flower takes on the red dye.
FLASHBACK!!! I did this back in elementary school for my science fair project. It was fun and I can’t wait to do it with my little man.
im doing this for school adn i have a q. do u cut the stem in half?
No, just cut the end in a diagonal so it has more surface area to soak up the color. As you can see in one picture we cut it in half to see if the flower would get two different colors in the same flower.
Cool….I’m going to have to do this with Mahala & Kaden!!!
Erica,
I really enjoy reading your blog. You always have such great ideas.
thx we might complet this