I gave away my first brush set yesterday, and thought some of you might need a quick tutorial on using Photoshop Brushes. They’re super easy and fun to use and can add that extra bit of digi-goodness to your designs! So fire up your Photoshop and follow along!

STEP 1: Download my brush set! Unzip the set, then extract the files into a folder on your hard drive. If you don’t have an unzipping software already, here are a few free ones:
STEP 2: Once you download and unzip my file, simply copy and paste the .abr file to your brushes folder and the next time you start Photoshop, the brushes will be available from your brush set menu. The brushes are typically stored in the presets folder wherever you installed your Photoshop program. For example mine are here:
C:Program FilesAdobePhotoshop Elements 7.0PresetsBrushes
C:Program FilesAdobeAdobe Photoshop CS3PresetsBrushes
STEP 3: Use your brush!
- Create a new Photoshop document, make it whatever size you wish, I typically do 12”x12” (3600px by 3600px) , 300 dpi, RGB color mode, and white background for my digital scrapbooking pages.
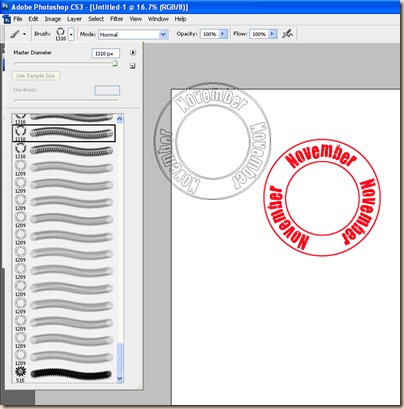
- Next, select the brush tool (the little paint brush icon), and then click the little drop down arrow next to your brush image on the menu bar, it is called the brush selection menu.
- Click on the circled arrow at the side to open a drop down menu, then select the ‘Load Brushes’ option. A list of all your installed brushes will appear. If your brush folder doesn’t automatically show up just browse to the above brushes folder, find your brush and click ‘Load’.
STEP 4: Once your brushes are loaded, you should see them in your brush drop down box. Simply select one of the brushes, then when you move your mouse back over your document, you’ll see the brush shape. Click down once to ‘stamp’ your brush onto your document. I recommend making a new layer before stamping so that you can move, edit, re-color, re-size your brush after it’s stamped.
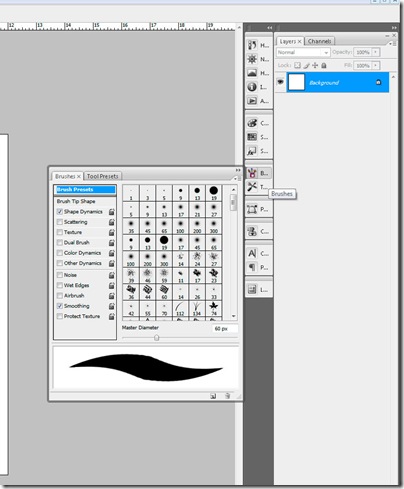
STEP 5: Customize your brush! Open the brushes palette by clicking on the brush icon on the right toolbar, or going to “Window” and “Brushes”. There are tons of ways to mess with your brushes, but that’s a whole other tutorial! Quickly, in the Brush Tip Shape box you can change brushes, diameter, rotation, hardness and spacing. In the Shape Dynamics you can mess with Jitter and if you look at the other options you can change scattering, texture and much more! Just play freely in here and see what you come up with you won’t be sorry! Just remember to create a new layer when playing with your brushes so you can experiment freely!
STEP 6: Now, go out and find yourself some great Photoshop brushes! The good news about the brushes is that there are literally TONS of freebies! Here are some of my favorites:
- Brusheezy
- Obsidian Dawn
- Photoshop Free Brushes
- FB Brushes
- Brush King
- Designer Digital Brushes (Not free, but great brushes! )
- Jessica Sprague (Not free, but great brushes!)
Note: The download also includes .png files for you to use. In this case, just use your marquee tool to select out the date stamp you want, press ‘V’ to select the ‘move tool’, then drag it onto your working document.
Happy Digital Scrapping!


Thanks! I love using Photoshop, but haven't yet installed any new brushes. But, I can now with your tutorial! Thank you!Also, I am having a giveaway on my blog if you want to check it out: http://www.meandmarielearning.blogspot.com
Thanks for this tutorial! I have never used brushes before but I've been wanting to. I have an ancient version on PaintShopPro but these instructions were close enough for me to figure it out too. Thanks again!BTW, we just finished decorating our homeschool room and we used your adorable Days of the Week and Weather charts, so I shared the link to your blog and the post you shared these in. I hope you can stop by and check it out, and thanks again for all your creative ideas! Your blog is such an inspiration!
Thanks for the info. I'd have never figured that out on my own. LOL
Quick question…I would love to do digital scrapbooking, but when I am finished I would like to be able to have the books printed and bound for me. Do you know of a good program that will allow me to do both? Thanks so much!New to homeschooling Mom!
Hi, I print my own pages, but I know several people who use picaboo and shutterfly to make their pages into bound books.
With some tools in Photoshop, such as Clone Stamp, the Brush Preset collector is used simply to edit the size of the brush tool, softness and opacity. Nice post! Great!