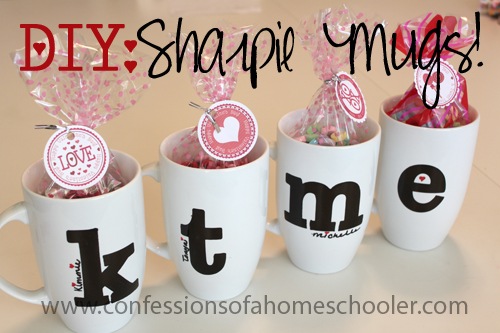
Hi everyone! I’ve seen a ton of DIY Sharpie Mug tutorials all over the internet so I was dying to try it!
I mean, seriously?
Sharpie on a mug?
Like that’s gonna last past the first wash.
Whatev’s.
But the rebel in me decided I would try it out for my self. And you know what? They worked!
With one very important caveat…
Check out our DIY Sharpie Mug Tutorial to see how to create these awesome personalized sharpie mugs for your BFFs this Valentine’s Day!
SUPPLIES:
- Plain white mugs ( I purchased these at Target, but you can find them all over.)
- OIL BASED SHARPIES. I REPEAT. OIL BASED SHARPIES. (You can find these at your local craft store. Make sure it says Oil Based. The regular sharpies you have hanging around your house will not stay put once you wash them.)
- Rubbing alcohol and cotton puffs
- Some candy of course.
- Optional: Candy bag, baker’s twine, and a Valentine’s Day tag!
All of this is explained in the video, but first wash your mug in warm soapy water. Next take some rubbing alcohol and wipe off the area you plan to decorate.
I used some alphabet stickers just to help make my mugs a little nicer. I’m no good with free-hand drawing! And sadly I haven’t had time to scrapbook, since around the time I had baby no. 2, so these super cute stickers were just beggin’ to be used!
I carefully traced around the sticker with my sharpie, then removed the sticker and filled in my monogram.
Place your mugs into a cool oven, then turn it to 425 degrees Fahrenheit, once heated bake the mugs for about 30 minutes.
I did have to bake mine twice as some of the sharpie flaked off after the first baking. But I just filled in the spots that flaked off, and re-baked them. The 2nd time was a charm, all is sticking well and have made it through a “test wash”. Now, they say these are dishwasher safe at this point, but I just hand washed them, so I can’t say for sure…
If you try to machine wash them let me know!
Once I decorated and baked my mugs it was time to decorate! I filled some fun party favor bags with my BFF’s favorite candies, then added a cute tag to finish off the project.
And voila’! Aren’t they adorable! Super cute, and yes that little “e” on the end was mine.
I mean, I had to test it out right?
I hope you enjoyed this tutorial, and Happy Valentine’s Day to you all!
And to my BFF’s who now know what they’re getting for V-day!
Psst…this craft is also great for Christmas, just change out the bags and candies to something more Christmas-y and you have a great DIY Christmas Gift!
If you try this send me some pics of your projects! I’d love to see how they turn out!


Thank you for this! I have seen these too and could not bekrve that it would stay on, so thank you for explaining that they should be oil-based!
Thanks for sharing we did plates with sharpies I didn’t know the oil based thing so they find work out well. We will definitely retry! Awesome!
I love these mugs!!! What a great gift idea ~ better than store bought any day! Thanks for sharing!
Great idea – love these easy but looks so difficult ideas 😉
This is such a sweet gift idea! Thanks for the tutorial and tips!
LOVE this! I’m hosting a Sharpie crafts link party on my blog this week, and I’d love it if you wanted to link up! Favorites will be featured in a compilation post next week, & we’re giving away a $50 Target GC and Sharpie prize pack! http://bit.ly/1c0IEvS
I recognize the stickers! TLC monogram stickers! They are beautiful! (And yeah, I haven’t scrapbooked since my 2nd was born either)
Thank you so much for sharing your knowledge! This custom mugs is the best thing that happened to me. I feel in love with it so much, especially when I presented it to my boyfriend as a gift. he was so happy with this.